Photos can be clicked on for a larger view.

Monday, December 24, 2012

Triple trunk pine

 Hello and thank you for reading this post. Today I want to talk about a triple trunk Japanese Black Pine that I recently purchased at the annual California Bonsai Society member's sale.
 I was attracted to it instantly. It isn't too usual to find a triple trunk pine  especially with slender trunks like this and it called to me from the moment I saw it. Since as a member I had a chance to preview what was for sale I decided that to be fair I would wait 5 minutes after they openned the gate to the public before buying it. A couple of people looked at it  and I was regretting being nice for a second, but lucky for me they passed it up. As soon as the 5 minutes was up I bought it.
 What I saw in this tree was a 3 trunk bunjin style pine. It's not usual to see mutliple trunk bunjins.  Bunjin  style trees are usually fairly thin and tall and have less foliage compared to the other styles, but more important are the feelings they invoke. For me a bunjin or literati sytle tree has to have a simple elegance and impart a subtle feeling of age, strength and perseverance. Styling wise the emphasis is on the shape of the trunks and usually sparse amounts of foliage. I think we can get the styling part down fairly quickly, but it will take more time in a pot to fully develop into a true bunjin.
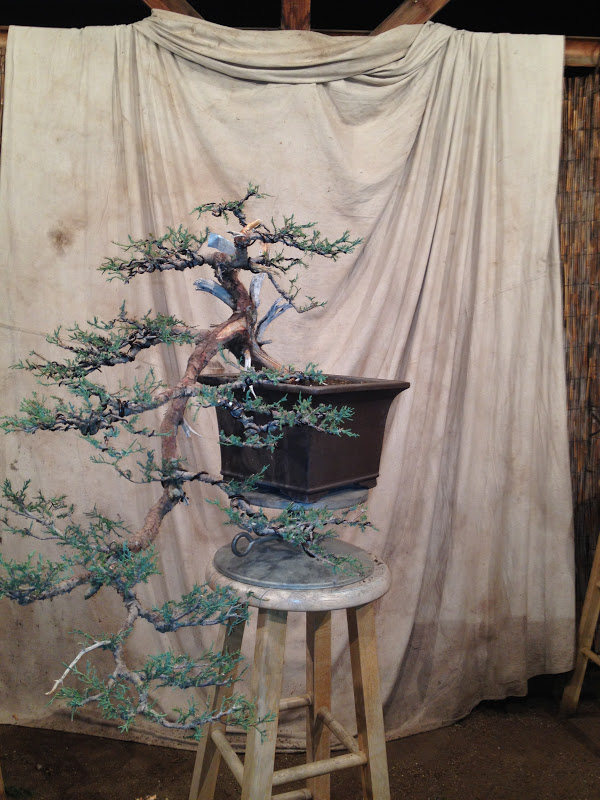
Here's the tree before doing any work to it. This was the front.

 I felt there was a better front so after getting dizzy from turning the tree so many times I decided that this front was one. I also decided that it needed a little change of angle.

Once I picked the front the next step was to clean up the tree and remove the old needles.
I also thinned out buds in areas where more than two buds grew back from last years candle pruning. Here it is after the clean up.
The next step is going to be to get some more movement into the trunks-specifically the two smaller trunks. To protect the tree and to allow me to bend the trunks with a large degree of safety the trunks were wrapped with raffia. The most important thing when using raffia is to be sure that there are no gaps in the wraps. Any areas that have gaps in them are much more likely to break, so be sure that all your wraps overlap the previous ones. Then a copper wire was placed on the trunk. I usually use aluminum but copper is stronger so I could use a smaller less noticeable wire to hold the bends in the trunk. Aluminum wire strong enough to do the same job would need to be almost twice as big.


Here is a close up of the base showing how the bark is starting to show some age and character. Aging of the bark is one of the things we have little control over. It mostly time that will do it. When the entire trunk looks like this ( about 10-12 more years) then the tree will really have the character to be a really good bunjin.


After applying raffia and wire to the trunks it's time to wire every branch. I spent about an hour or so wiring then I placed the branches in the desired position and put some subtle movement into the trunks. I'm pleased with the results so far. This spring I'll transpalnt this either into a rustic shallow round pot or possibly on a stone slab. Here is the result of the work to this point.

I hope you enjoyed todays post. As we come to the end of this year I want to take a minute to say thanks to each and every one of you who read these post and to wish you all fantastic holidays and a happy, healthty and prosperous new year.


Friday, November 30, 2012

Works in progress

In this post I going to show and talk about a few different works in progress. One new project with a Japanese Black Pine and follow-ups on two previous projects, a tall Atlas Cedar and a Juniper bent using re-bar. Hope you enjoy.
Lets start off with the Japanese Black Pine. I won the tree in a raffle at the last California Bonsai Society Convention. It was in pretty sad shape when I first saw it. The soil was terrible, heavy and very compacted and stayed wet. The rest of the tree was no great shakes either, but what the heck it only cost a buck for the raffle ticket.
As you can see there's not much there. For about a minute I toyed with the idea of making a bunjin style using just the top branches but quickly discarded that idea.
It's pretty obvious that the best option for a bonsai is to use just the lower branch.
Out came the branch cutters.
I cut off the two upper left branches leaving a jin from one of them. Then I cut off some and jinned the rest of the top branch. I also transplanted the tree into a good bonsai mix at the same time. After this i pretty much only watered and fertilized to allow the tree to recover. By early this month it was strong enough for a little more work.
I cleaned up old needles, did some minor trimming and wired the whole tree. It should look pretty good in the next couple of years.
 The next tree will be familiar to those of you that read this blog. Its the large Juniper that I used rebar to bend. The beginning work can be found here-
 http://bonsaibpsbonsaiblog-bonsai.blogspot.com/2012_03_01_archive.html
This is the third round of work since starting in March. In the first round I determined branches, made some major bends and wired primary branches. Then I did the initial work on the deadwood.
This next phase involves using a clamp made for woodworking as a jack and guy wires to further compact the bends and shorten the tree. Then it was fully wired. Here is the tree before this work. As you can see it's growing pretty well.
It's still really tall though so I decided to further compress the bends to try to shorten it.
Using a woodworking clamp as a jack I compressed the first bend. When it got to as far as I thought was safe I used copper wire to make a guy wire to hold it in position.
Then I did the same thing to the upper bend. After compressing the bends and securing them in place with guy wires I wired the whole tree.
It's hard to tell in the photograph but it's about 6 inches shorter then when we started this phase.
  The last tree I want to talk about today is the tall Atlas Cedar that I started last November. The original post can be found here-
http://bonsaibpsbonsaiblog-bonsai.blogspot.com/2011/11/cedar-bonsai-from-large-nursery-stock.html
The tree was growing so well I needed to take the wire off in early August. In mid October I decided it was time for another haircut and wiring. Here it is before the work.
As you can see this is a tall tree I had to stand on a milk crate to wire the top branches-and I'm 6"3"!
Here's the tree after the work. I'm probably going to shorten and simplify the apex, but that can wait. I'm pleased with the progress with this tree in such a short time.
I want to thank you for taking the time to read my blog. I'm always looking to hear your comments and suggestions.

Monday, October 15, 2012

Before and after

Most of the work that is included in this post was meant to be it's own post. Sometimes though it's hard to remember to stop and take photo's of the whole process. These were mostly in that category. So even though I can't share the whole process with you I think you'll enjoy the before and after shots.

The first few trees belong to clients.
 First up is an old Foemina Juniper that hasn't seen a scissors in a long time.  There was no longer any definition or separation in the branching, it looked like three mounds of foliage.


After a couple of hours of pruning, sticking my fingers and wiring I was able to rework the structure of the tree. A little drastic but necessary in this case.

Next is an old Kishu Shimpaku grafted onto California Juniper. It also hadn't been touched in quite some time and had formed pompoms in the branching. Kind of silly looking if you ask me. This owner insisted on only minor changes so I did the best I could.

I cut off the existing left hand pompom apex then lightly pruned and wired the tree. The trimming and wiring created separation in the foliage pads, better defining the branch structure. Then a little cleaning of the deadwood and live veins to finish the job. 

Next up is a monster of a tree. It took four men to move this one. It's a Eugenia aggregata- Cherry of the Rio Grande Apparently at one time this tree was part of the Kennedy family bonsai collection. This one needed a major haircut and wiring.


The result after a bunch of hours over two days of trimming and wiring.


The rest of the trees that follow belong to me.

This one is a variety of Chinese Juniper in the cascade style. It was first styled about 10 years ago and it is time to rework it. The foliage has gotten too dense and was throwing off the proportions of the tree. It no longer looks like a tree struggling to survive on the side of a cliff somewhere.
 Following a late night session of pruning and wiring the bonsai is re-born.
Here we have a California Juniper. The goal with this one is to lower the apex and to lighten up the branch structure. The first back branch is lower than the first branch and it's making the tree look to busy.
 I cut off and jinned the apex and created a new apex by lifting a side branch and wiring it into place. I also removed the first back branch and gave the tree a good haircut.

Finally , my prized California Juniper that I want to put in the CA. Bonsai Society show in March. Now it's time to do a little refinement trimming and wiring. 


On this one I wired just about every single twig. About 6 weeks before the exhibit I'll remove the wire and place moss on the surface of the pot.

Well I hope that you enjoyed these before and after examples. As always I welcome any comments, questions or suggestions.

Wednesday, October 3, 2012

Live oak styled boxwood

Hello all. Today's post is going to show the initial styling of an old nursery boxwood to resemble a Live Oak. I was inspired by a thread started on the Internet Bonsai Club  ((http://ibonsaiclub.forumotion.com) about styling boxwoods to look like live oaks. In that thread the poster was referring to Southern Live Oaks but here in California we have many oaks of our own and it is one of these, the Coast Live Oak that I had in mind . Southern Live Oaks are similar looking but bigger than our native oaks. Oaks are very long lived trees and there are numerous examples that are hundreds of years old. Here in southern CA they are very tough trees often surviving wild fires. They tend to grow wider then tall and often have wide spreading rambling branching which suits our material perfectly. There are also very often deadwood and hollows in them.
Boxwood is a very good candidate for bonsai. They are easy to grow and are readily available both in nurseries and in the urban landscape. They are rarely bothered by insects or disease and can be used for all sizes of bonsai. They respond very well to regular watering and fertilizing and aren't to picky about the soil they are grown in. It's probably one of the most common hedging materials in this country. They can be a bit tricky to wire older branches but do lend themselves to the clip and grow technique for styling. It's relatively easy to find large old specimens especially from construction sites or homeowners redoing their gardens.

Here is the tree we'll be working on today. It's 12-15 year old nursery stock with a great nebari and nicely aged bark. As you can see there are plenty of branches to chose from for our design. The roots spread out very nicely all around the trunk and the bark has the texture and character that only time can provide.
One thing that I found a little boring was how straight the lower trunk was, so to help make it more interesting and to help disguise where a large branch was cut I decided to create a shari and to hollow the trunk a little. The wood of boxwoods is very hard and dense and lends it self to deadwood. I started by scraping the bark from the trunk in the area I wanted the shari in.

 
I then added a little texture to the trunk.
I decided that I wanted it to be a little more dramatic and started to hollow the trunk.
This is the initial work on the deadwood for now. At a later date I'll completely hollow the trunk and add more detail to the shari.
I then removed all branches that I knew I wouldn't use in the design and thinned out the remaining branches. Then I started applying wire to every branch on the tree.

As I wired I pulled the branches down and placed them so that they all received the sun and none were directly over the one below it. I also put some movement into the branches though this was a little difficult since the older branches are really hard to put much movement in them.

I think I've captured the essence of a Coast Live Oak with this tree. Foliage masses will be created by the clip and grow method. It's pretty easy to develop foliage on boxwoods by only allowing growth were you need it. Any growth on the trunk, in the crotches of branches, etc. should be removed as soon as possible.
This coming spring I'll do the root work and get it into it's first bonsai pot. In a couple of years I envision this in a shallow oval pot.
 As always I welcome any and all comments. Thanks for reading.

Friday, August 24, 2012

Carving a pomegranate part two


Hello all, it's been awhile but between being extremely busy and then 21 days over 100 degrees and 8 of them over 110 I haven't had the time or opportunity to do too much extensive work on the bonsai's. It's cooled down into the low and mid 90's now.
Today's post is going to show the next phase of work on the carved pomegranate.
Here is where we left off at the end of the last post-

 This work was done about 2-3 weeks after the initial carving. The wait allowed some of the newly created deadwood to dry out and harden some which is important for the detail carving.
Using a variety of smaller bits and tools, some more texture and detail has been added.
Here are the tools and bits used in this phase of the work.


The main tool in these steps is the Dremel  type rotary tool.( the two tools on the right) It can be used with a wide variety of 1/8th inch shaft bits. Being able to use various cutters similar to what we use on the Makita die grinder, only smaller, to rotary wire brushes and sanding flaps the Dremel not only removes and shapes the wood but can also be used to remove the marks left by the bigger tools.
Using the straight cutter I was able to undercut around some of the edges of the larger cuts creating more depth and layers of texture.
Before using the straight cutter-
After- notice the shadow caused by undercutting the edge,. This adds more texture and depth and helps to further enhance the hollowing of the trunk.
Using some small triangular bits, the straight cutter and a carbide flame bit more depth and texture is created. 

Some of the hollowed areas where deepened and enlarged-
Using wire brushes and sanding flaps the surface was smoothed out and major tool marks were removed.

Lime sulphur with a bit of India ink to tone it down was applied to all exposed deadwood. The India ink helps give the wood a grayish tone rather then the white that straight lime sulphur gives. The white works with conifers but on deciduous trees the deadwood looks more natural with gray tones. It still looks yellow when applied but turns gray as it dries.
For now the carving is done. It will still need a little more detail work but I'll do that next year after the wood has had a chance to be exposed to the elements for awhile.


Now the tree needs to be left alone for awhile. The branches need to thicken so I won't be cutting them at all this year. I will Use some wire to position the branches and get  some movement at their bases as well as remove any unnecessary branches and maybe reduce the apex. For the most part I'll use the clip and grow technique to develop the branches. With our long growing seasons I think I can develop decent branching on this in 4-5 years. In the meanwhile I'll feed, clip and grow and clip some more. Next spring I may put it into a oversized bonsai pot.

I hope that this post was enjoyable. As always I welcome any thoughts, questions or suggestions. Be well and stay cool.

Wednesday, July 4, 2012

Carving a giant pomegranate cutting pt.1

Hello and thank you for reading my blog.
Today's post is going to show the first steps of carving a giant pomegranate cutting. It is 6" across the base at the soil line and 23" to the tip of the apex.
In January of 2009 this was a section of a pomegranate trunk that we were removing as part of a garden project. It already had a large deadwood area but enough of a live area that I thought it might take. It was basically a stump with a couple of small branches. The first year it budded quite a bit from all the live areas.  I let it grow unchecked the first year, reduced the number of branches and let it grow and cut it back a couple of times a year since then. Now it's time to start the transformation into a bonsai.
Here are some shots of the tree from all four sides prior to todays work.

Tentative front

 Right side

 Back

 Left side

The first thing I have to do is to remove unnecessary branches and to shorten the remaining ones so that they are not in the way of the carving. This tree seems to sprout new buds from old wood pretty easily so I don't really need to worry too much about the branching at this stage.

Here is the tree after the pruning. There are pretty much all the primary branches necessary to frame the trunk which is going to be the main point of interest of this tree. The carved ancient looking trunk, and in time, the winter silhouette are going to be where the eye concentrates on this tree.


You'll notice that a little more than half way up the trunk there is a bulge that causes some reverse taper. This will be one of the things I correct with the carving. I also intend to add taper to the trunk and make it look like an old hollowed trunk tree out in an abandoned field somewhere. 

I'll start out by creating the profile of the tree. Reducing where needed, opening holes and creating spaces using a variety of tools and bits. I'm not going to worry so much about the finish or even too many details at this point. This first step is to get the major block carving and wood removal done.
Here are the tools laid out and ready for duty.


From left to right we have- a Makita die grinde,r the basic bonsai carving tool, next is a 4" angle grinder with a large steel disc with 3 cupped cutters, then 2 smaller Dremel carving tools followed by a Arbortech mini grinder and a 1/2 drill with a spade bit. Not shown are a pair of safety glasses and a dust mask which are on me. The Dremel won't be used in this phase of the work.

I'll start off with the Makita and a tungsten carbide rotosaw blade to start to remove excess wood and put movement in the trunk.

After a few minutes with the rotosaw.


I then decided I needed a bigger gun and changed to the grinder with the cupped cutters on a 4" steel disc. This tool can remove lots of wood in a hurry. It can cut deep grooves, shave down big chunks of wood and generally remove large quantities of wood.


After several minutes with this tool, dramatic results can be seen. Extreme care and control is necessary because this tool can do quite a bit of damage if allowed to get away from you.


As you can see big changes were made with the grinder.

Next I'm going to switch back to the Makita, this time with a tool imported from Europe that has a small disc with cupped cutters mounted on a fairly long shaft. This is used for creating grooves, removing quantities of wood and hollowing out areas.  It's very useful for cutting into the trunk and creating holes while maintaining the outer layers of wood.


 The other tool I used today was the straight cutter on the Makita. It looks like a broken drill bit but it's a very versatile tool. It can undercut bigger holes giving another layer of texture. It can create grooves and be used to create movement texture and depth in other cuts. Its also useful for creating openings into areas dug into the trunk with another bit. A lot of the texturing below was done with this tool.


So after a couple of hours work I think this is a good place to stop for now. Here is what the tree looks like after todays work.

Stay tuned for part two. As always I look forward to any comments or questions.
Thanks again for reading.